Cloud and Self-Hosting
How to Configure Proxmox Additional Storage
By Amjid Ali · · Updated · 2 min read
In this article
This is step by step guide that will help you to Add storage to your existing Proxmox Virtaul Environment, you will learn how to format the disk, and use it for Proxmox.
Scenario : Proxmox Storage
I added SAS 900 GB X 2 Drives into the H P Server, created RAID 10 in Hardware. Now this is available to me to use. How to add this to PVE. Storage details of proxmox can be found here https://pve.proxmox.com/wiki/Storage
LVM Storage
LVM storage is used to store images, backups etc. This is great option and it is much reliable. Only one problem is that if I assign 100GB storage to a VM, the Physical Volume (PV) assigns 100% of 100 GB to that VM, which is not efficient way. However, LVM-Think is the Solution.
Proxmox LVM Thinpool
If You create 100GB VM Disk and it occupies only 10GB, from physical storage only 10GB will be used. Isn’t it efficient, this is done in LVM-Thinpool.
I will explain you how to create the Proxmox LVM Thinpool. Thinpool also stores snapshot images.
Step by Step Guide to Create LVM thin Pool
So let us see how we can create LVMThin-pool. I have added 900GB into my Proxmox VE 7.0 Node. Below is step by step guide what I did.
Format Disk
This will for sure remove all the data from the Disk, which I am sure about. My Disk name is sdb and the path is /dev/sdb so I will used below command to clean to create partition table
sgdisk -N 1 /dev/sdb
Create Physical Volume and Volume Group within Disk
Now PV is Physical Volume and VG is Volume Group. I created both using the below commands in my disk named sdb
pvcreate --metadatasize 1024M -y -ff /dev/sdb1vgcreate --metadatasize 1024M proxvg /dev/sdb1
Create LVM Thin Pool
LVM (Logical Volume Manager) Think pool is the option that we need to create. Out of 900 GB I want to assign 400 GB to Thin pool. So I will use below commands to create the Thinpool
lvcreate -l 100%FREE --poolmetadatasize 1024M --chunksize 256 -T -n proxthin proxvg
lvcreate -n proxvz -V 400G proxvg/proxthin
Create EXT4 File System
mkfs.ext4 /dev/proxvg/proxvz
Mount new Logical Volume (LV)
Now mount the new Logical Volume to Proxmox Node so we will create a new directory
mkdir /media/vz
echo '/dev/proxvg/proxvz /media/vz ext4 defaults,errors=remount-ro 0 2' >> /etc/fstab
mount -a
lvs -a
Now Add the Directory in the Web User
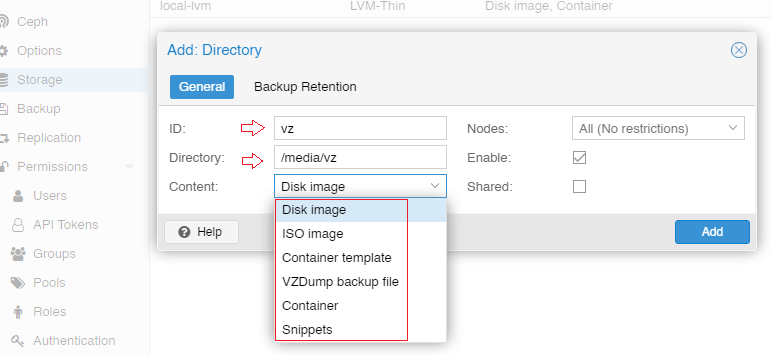
You can simply follow below screeshot, first click on Data Center, then Storage and then add directory.
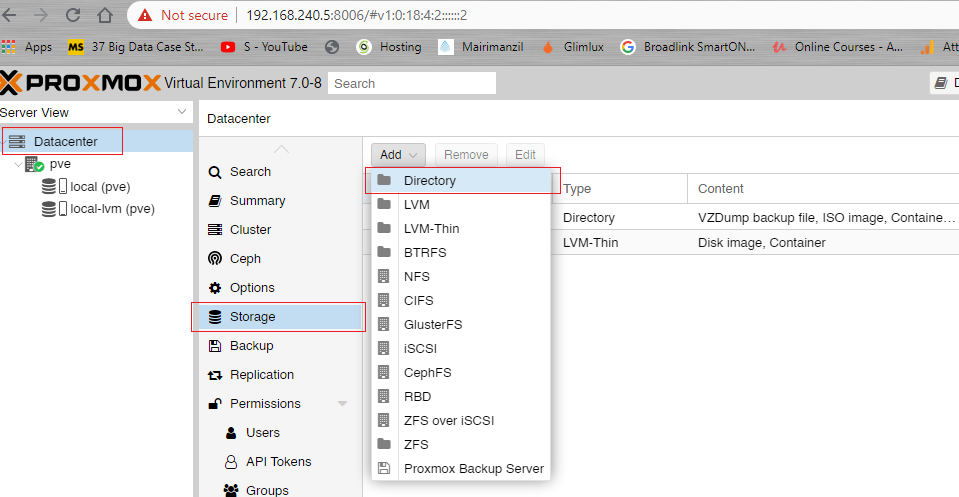
The ID will be or any name you want and Directory path will be the one that we created on top.
ID : vz
Path : /media/vz
Add LVM Thin
Now you can create LVM Thin as per the below screenshot.
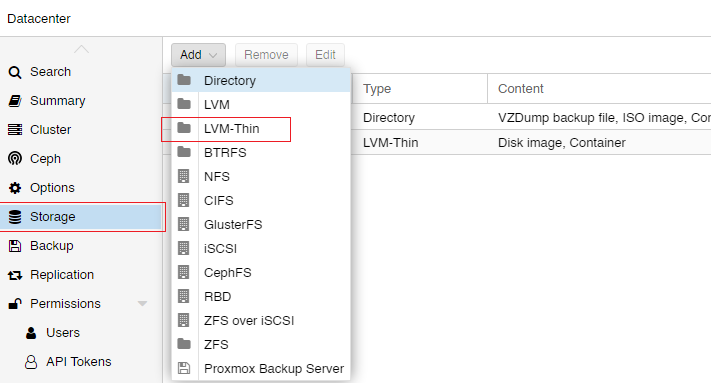
Use the below Information for in the box.
id:proxthin Volume group:proxvg Thin Pool:proxthin
Keep reading
 Cloud and Self-HostingInstalling Kubernetes Dashboard on a K3s High Availability Cluster (Ubuntu 24.04)The Kubernetes Dashboard is a browser-based UI that allows you to visualize, manage, and troubleshoot workloads and resources inside your Kubernetes clu... · 2 min read
 Cloud and Self-HostingInstall a 3-Node HA Kubernetes (K3s) Cluster on Ubuntu Server 24.04 Step-by-Step (Proxmox/VM Friendly)Step-by-step guide to install a 3-node HA Kubernetes (K3s) cluster on Ubuntu Server 24.04 using Proxmox VMs. Includes setup, firewall rules, tokens, and verification. · 5 min read
 Cloud and Self-HostingHow to Install and Configure n8n on Oracle Cloud Always Free VM (Ubuntu 24.04)n8n (short for nodemation) is an open-source workflow automation platform that allows you to connect applications and APIs, automate repetitive tasks, a... · 4 min read